Understanding Transfer Learning With Pretrained VGG16 Network
Transfer learning is a powerful machine learning technique where a trained models’ parameters are reused instead of training from scratch in order to fine tune on specific dataset for specialized problem.
In this blog, we will try to understand transfer learning through hands on experience with PyTroch framework using pretrained VGG16 network trained on ImageNet dataset on to new Cat and Dogs dataset.
TLDR; Complete jupyter notebook of this implementation is available here.
Why Transfer Learning?
Training a large convolutional neural network from scratch reqiuires millions of labeled images, significant GPU compute and long training time. Instead, with this learning technique we can simply load a pretrained model trained on generalized dataset like ImageNet (1.2 million images), replace the final classification layer and train only the last few layers (or we can fine tune entire model).
About VGG16
VGG (Visual Geometry Group) was the name of the team participating in ILSVRC - 2014 from University of oxford, Department of Engineering Science. Their one of the purposed network architecture with 16 layers (convolutional and dense layers) was called VGG16. The original paper explaining everything in detail about VGG networks is available in arxiv.
The pretrained VGG16 model, as the name says, is 16 layers deep with 13 convolutional layers and 3 fully connected layers. It is trained on ImageNet dataset with 1,000 object categories. The input image size to the model was 224 x 224 pixels. The model used 3x3 convolutional filters throughout the network and ended with fully connected classifier followed by a softmax layer for classification.
Download and Extract Dataset
Download the Cat and Dogs
dataset and extract the zip file. You will get the dataset directory as kagglecatsanddogs_5340
and inside cut PetImages directory and paste at the project root or if comfortable
leave as is and update the path.
Step 1: Install and Import libraries
import os

from PIL import Image, UnidentifiedImageError
import matplotlib.pyplot as plt

import torch
import torch.nn as nn
import torch.optim as optim
from torch.utils.data import Dataset, DataLoader, random_split

from torchvision import datasets, models
from torchvision.transforms import v2
Step 2: Custom Dataset Class
In order to train a PyTorch model we should create compatible dataset and data loaders. To learn more about them study here.
class CatDogDataset(Dataset):
    def __init__(self, root_dir = "PetImages", transforms = None):
        self.root_dir = root_dir
        self.transforms = transforms

        self.classes = ["Cat", "Dog"]
        self.class_to_id = {"Cat": 0, "Dog": 1}

        self.image_paths = []
        self.labels = []

        for class_name in self.classes:
            class_dir = os.path.join(root_dir, class_name)
            for img_name in os.listdir(class_dir):
                if img_name.lower().endswith((".png", ".jpg", ".jpeg")):
                    img_path = os.path.join(class_dir, img_name)

                    try:
                        with Image.open(img_path) as img:
                            img.verify()

                        self.image_paths.append(img_path)
                        self.labels.append(self.class_to_id[class_name])

                    except (OSError, UnidentifiedImageError):
                        print(f"Skipping corrupted image: {img_path}")

    def __len__(self):
        return len(self.image_paths)

    def __getitem__(self, idx):
        img_path = self.image_paths[idx]
        label = self.labels[idx]

        image = Image.open(img_path).convert("RGB")

        if self.transforms:
            image = self.transforms(image)

        return image, label
Step 3: Define Image Transformations
Since VGG16 expects 224×224 RGB images, we resize and normalize using ImageNet statistics.
mean = [0.485, 0.456, 0.406]
std = [0.229, 0.224, 0.225]

transforms = v2.Compose([
    v2.PILToTensor(),
    v2.ToDtype(torch.float32, scale=True),
    v2.Resize((224, 224)),
    v2.Normalize(mean, std),
])
Step 4: Create Dataset and DataLoaders
We are splitting 80% of total data into training and rest 20% into testing set. Here,
I am using BATCH_SIZE of 16 but once comfortable you can play around with this
parameter considering the GPU memory size to get better results.
DATASET_ROOT = "/content/kagglecatsanddogs_5340/PetImages"

dataset = CatDogDataset(DATASET_ROOT, transforms=transforms)

train_size = int(0.8 * len(dataset))
val_size = len(dataset) - train_size

train_dataset, val_dataset = random_split(dataset, [train_size, val_size])

print(f"Train dataset: {len(train_dataset)}")
print(f"Validation dataset: {len(val_dataset)}")

BATCH_SIZE = 16

train_loader = DataLoader(train_dataset, batch_size=BATCH_SIZE, shuffle=True)
val_loader = DataLoader(val_dataset, batch_size=BATCH_SIZE, shuffle=False)
Train dataset: 19998
Validation dataset: 5000
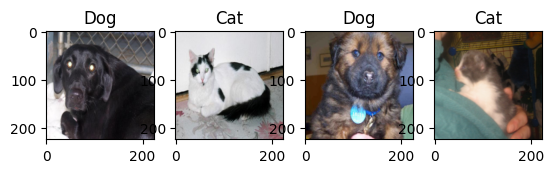
# Visualize sample data
viz_transforms = v2.Compose([
    v2.PILToTensor(),
    v2.Resize((224, 224))
])
viz_dataset = CatDogDataset(transforms=viz_transforms)
VIZ_BATCH = 4
viz_loader = DataLoader(viz_dataset, batch_size=VIZ_BATCH, shuffle=True)
viz_iter = iter(viz_loader)
img_batch, label_batch = next(viz_iter)

fig, axes = plt.subplots(1, VIZ_BATCH)
for i in range(VIZ_BATCH):
    axes[i].imshow(img_batch[i].permute(1, 2, 0))
    axes[i].set_title(viz_dataset.classes[label_batch[i].item()])
Step 5: Load Pretrained VGG16
device = torch.device("cuda" if torch.cuda.is_available() else "cpu")

model = models.vgg16(weights=models.VGG16_Weights.IMAGENET1K_V1)
model = model.to(device)
Step 6: Freeze Feature Extractor Layers
These are the layers of VGG16 network. And, its last classification layer has 1000 neurons for the categories of ImageNet challenge.
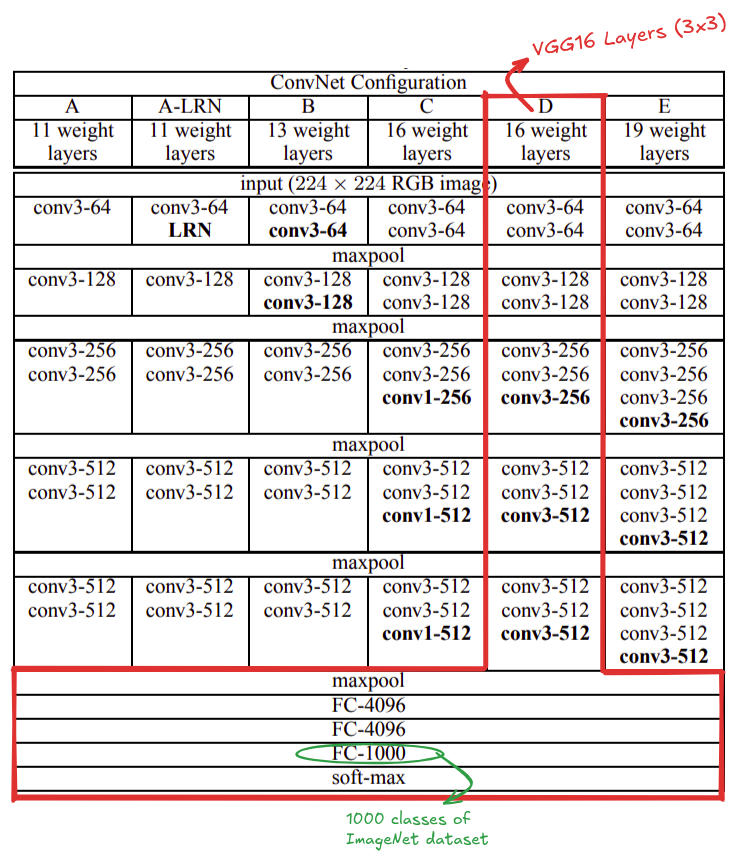
Source: https://arxiv.org/pdf/1409.1556
We freeze convolution layers so we only train the classifier, for us in the case of cats and dogs classification should be 2.
for param in model.features.parameters():
    param.requires_grad = False
Step 7: Replace Final Classifier Layer
num_features = model.classifier[6].in_features

model.classifier[6] = nn.Linear(num_features, 2)
model = model.to(device)
Step 8: Define Loss and Optimizer
We are using CrossEntropyLoss criterion to compute the cross entropy loss between input logits and target with fixed learning rate of 0.001.
criterion = nn.CrossEntropyLoss()
LEARNING_RATE = 0.001

optimizer = optim.Adam(
    model.classifier.parameters(),
    lr=LEARNING_RATE,
)
Step 9: Training Loop
We will train the model for 10 epochs. I train this notebook in google colab L4 GPU but free tier GPU should be work.
EPOCHS = 10

for epoch in range(EPOCHS):
    model.train()
    running_loss = 0.0
    correct = 0
    total = 0

    for images, labels in train_loader:
        images, labels = images.to(device), labels.to(device)

        optimizer.zero_grad()
        outputs = model(images)
        loss = criterion(outputs, labels)
        loss.backward()
        optimizer.step()

        running_loss += loss.item()

        _, predicted = torch.max(outputs, 1)
        total += labels.size(0)
        correct += (predicted == labels).sum().item()

    train_acc = 100 * correct / total

    print(f"Epoch [{epoch+1}/{EPOCHS}] "
          f"Loss: {running_loss/len(train_loader):.4f} "
          f"Train Acc: {train_acc:.2f}%")
Epoch [1/10] Loss: 1.6077 Train Acc: 96.74%
Epoch [2/10] Loss: 0.8413 Train Acc: 98.25%
Epoch [3/10] Loss: 0.5798 Train Acc: 98.81%
Epoch [4/10] Loss: 0.8413 Train Acc: 98.99%
Epoch [5/10] Loss: 0.7324 Train Acc: 99.14%
Epoch [6/10] Loss: 0.5298 Train Acc: 99.37%
Epoch [7/10] Loss: 0.5507 Train Acc: 99.42%
Epoch [8/10] Loss: 0.7109 Train Acc: 99.49%
Epoch [9/10] Loss: 0.9513 Train Acc: 99.45%
Epoch [10/10] Loss: 0.5752 Train Acc: 99.62%
Step 10: Validation
We evaluate the model’s performance in the validation dataset.
model.eval()
correct = 0
total = 0

with torch.no_grad():
    for images, labels in val_loader:
        images, labels = images.to(device), labels.to(device)
        outputs = model(images)
        _, predicted = torch.max(outputs, 1)

        total += labels.size(0)
        correct += (predicted == labels).sum().item()

val_acc = 100 * correct / total
print(f"Validation Accuracy: {val_acc:.2f}%")
Validation Accuracy: 98.78%
# Sample prediction
val_iter = iter(val_loader)
img_batch, label_batch = next(val_iter)
img_batch.shape, label_batch

outputs = model(img_batch.to(device))
_, pred_batch = torch.max(outputs, 1)

fig, axes = plt.subplots(1, 4)
for i in range(4):
    axes[i].imshow(img_batch[i].permute(1, 2, 0))
    axes[i].set_title(dataset.classes[pred_batch[i].item()], color = "green" if label_batch[i] == pred_batch[i] else "red")
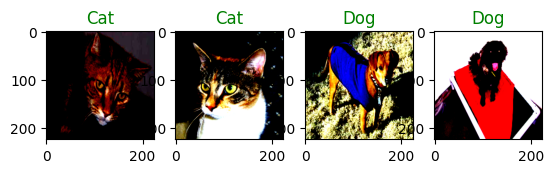
The images are slightly different in contrast due to normalization.
Fine Tuning for Maximum Performance
So far, we trained only the new classifier head, while keeping the convolutional backbone frozen. This is often sufficient for many tasks. However, when the target dataset is significantly different from ImageNet, fine-tuning deeper layers can substantially improve accuracy.
Fine-Tuning works because pre-trained networks learn generic low-level features in early layers like edges, colors, textures and task specific high level features in deeper layers like shape, object parts and semantic structures.
For cats vs dogs, the low-level features are transferable, but high-level features such as fur patterns, ear shapes, and facial geometry benefit from fine-tuning.
Fine-Tuning Strategy
Instead of unfreezing the entire network, we:
- Freeze early layers
- Unfreeze only the deeper layers
- Train with a very small learning rate
This avoids catastrophic forgetting, overfitting and training instability.
Selective Layer Unfreezing
We unfreeze only the later convolution blocks of VGG16:
for param in model.features[24:].parameters():
    param.requires_grad = True
Since we’re modifying pretrained weights, we reduce learning rate:
optimizer = optim.Adam(filter(lambda p: p.requires_grad, model.parameters()), lr=1e-5)